

English
Reply to an Offer/CO - Agent of One of the Two Parties
Here are the steps to follow to reply to an offer and a counter-offer (CO) when the agent represents sellers or buyers only. In this article, you will see more specifically a situation with an agent representing buyers who make an offer to sellers represented by another agent and these sellers reply with a CO that will be accepted by the buyers.
1- Offer
Buyer’s Agent
Add a blank offer in the eZsign folder. For more information, please see the article Adding/Editing/Deleting a Document in an eZsign Folder.
Load the offer template from your governing body (e.g. OACIQ). For more information, please see the article Loading a Template from your Governing Body.
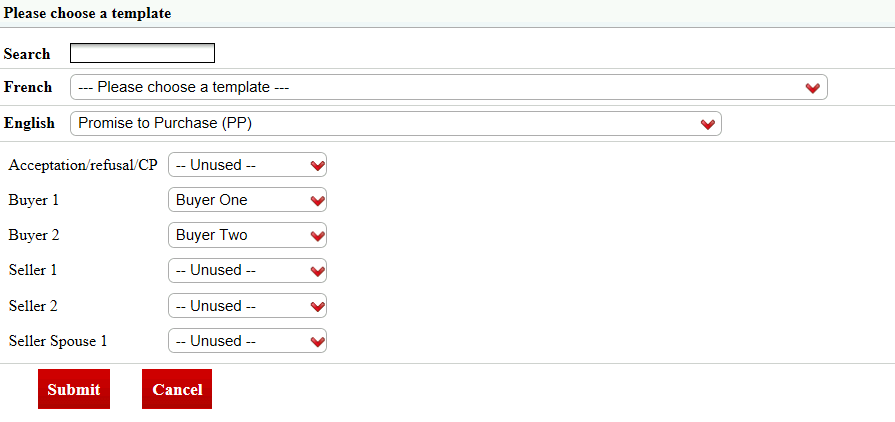
- Select the buyers for Buyer 1 and Buyer 2 (if applicable) and leave "-- Unused --" for other fields. Click on Submit.
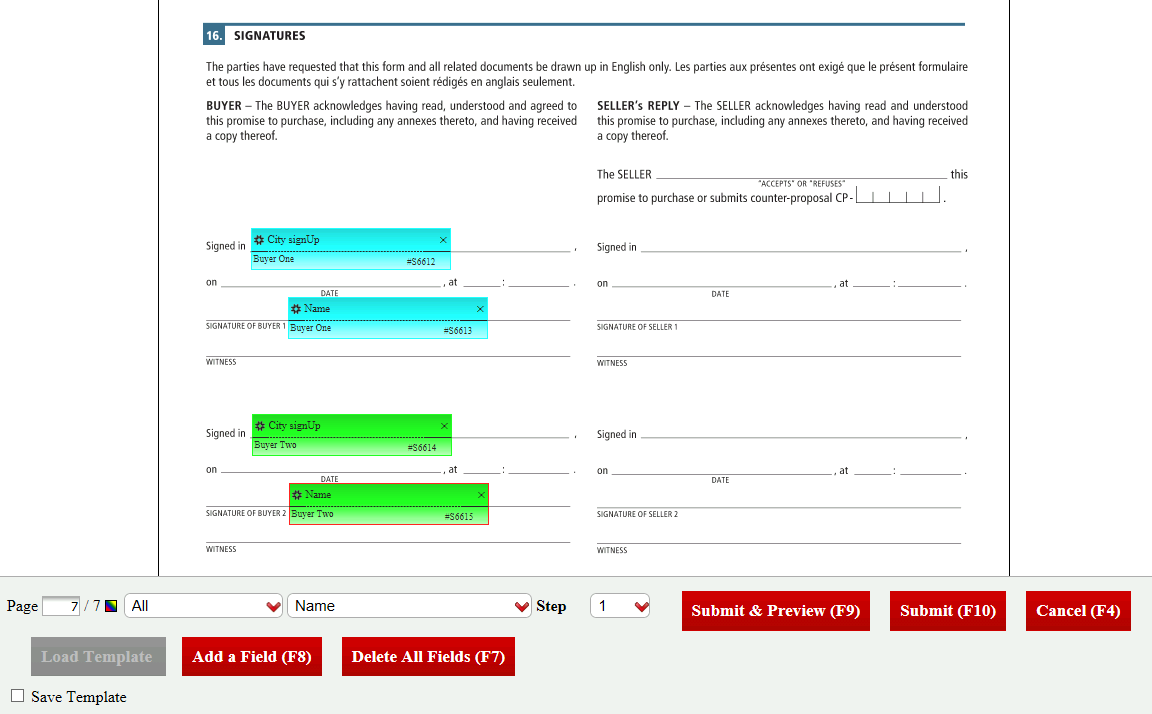
The fields will automatically appear in the right place in the "Signatures" section of the document, so do not edit/move them. Click on Submit.
Send the offer to buyers. For more information, please see the article Sending Documents to Sign.
Buyers sign the offer. For more information, please see the article Signing a Document as an External Signatory.
Seller’s Agent
Add the offer signed by buyers in the eZsign folder. For more information, please see the article Adding/Editing/Deleting a Document in an eZsign Folder.
Load the offer template from your governing body (e.g. OACIQ). For more information, please see the article Loading a Template from your Governing Body.
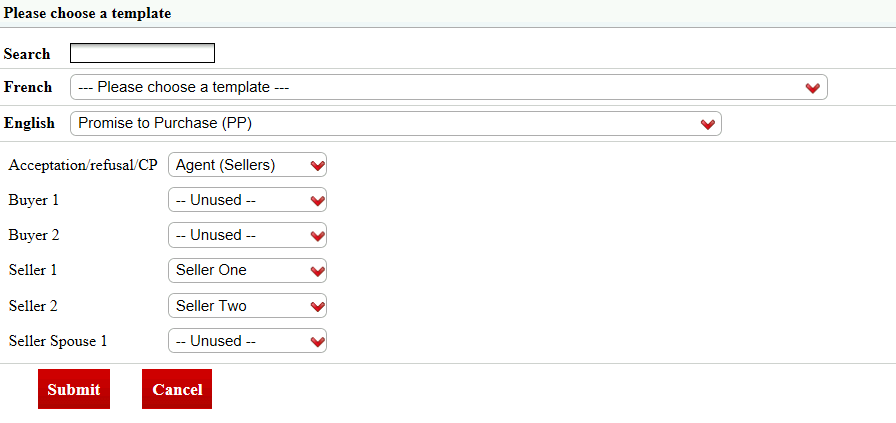
- Select yourself for Acceptation/refusal /CP (CO), select the sellers for Seller 1 and Seller 2 (if applicable) and leave "-- Unused -- for other fields. Click on Submit.
NOTE: You can also select one of the sellers for the Acceptation/refusal /CP (CO) field. However, we recommend selecting the seller’s agent because if the answer is a counter-offer, it will be necessary to add the number of this counter-offer.
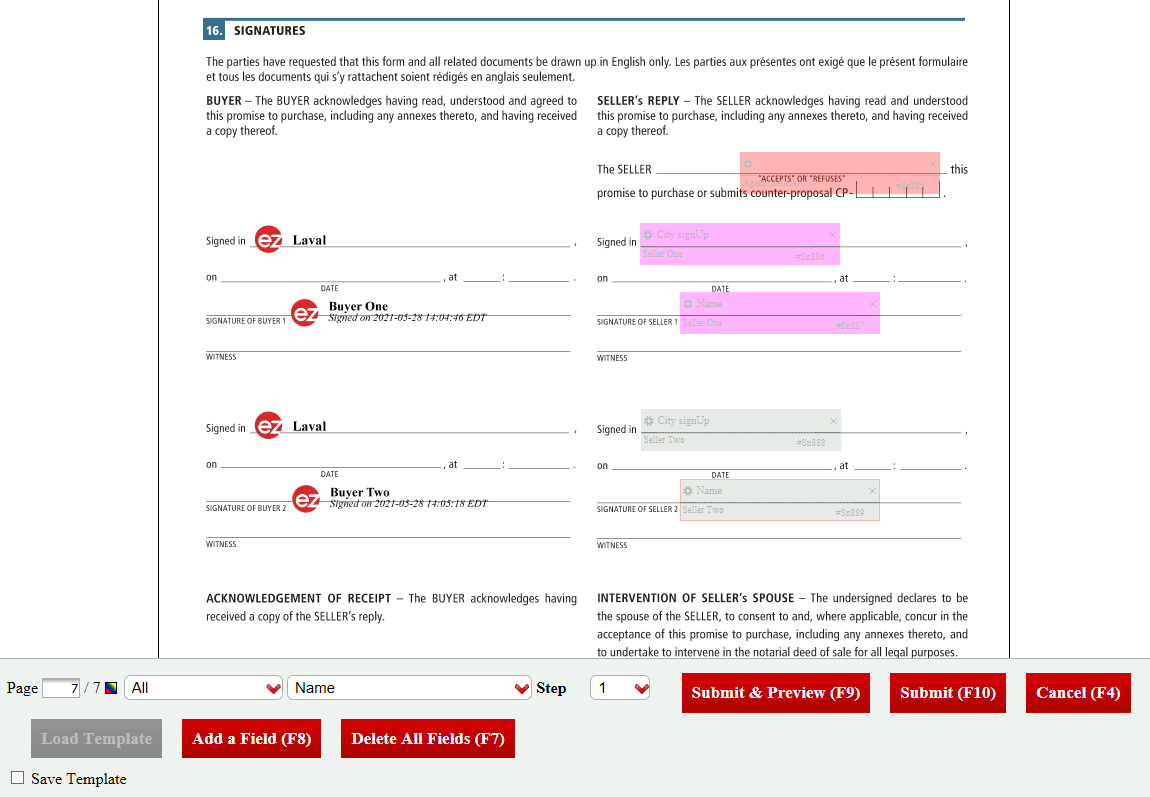
- The fields will automatically appear in the right place in the "Signatures" section of the document, so do not edit/move them. Click on Submit.
NOTE: The seller’s agent step will be "2" and the seller’s step will be "3".
- Send the offer. For more information, please see the article Sending Documents to Sign.
NOTE: Only you, the seller’s agent, will appear in the signatories because you have to sign the offer before the sellers.
- Sign the offer from your eZsign platform. For more information, please see the article Signing a Document as a User.
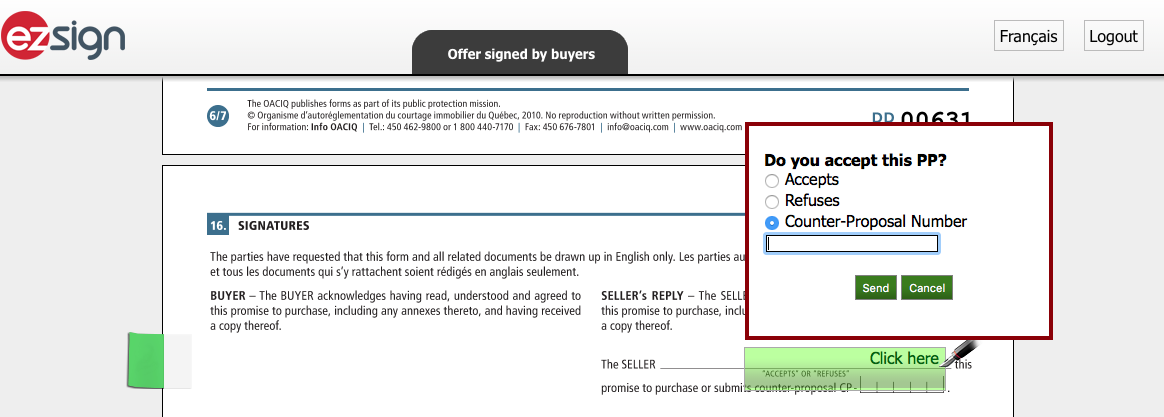
Select Counter-Proposal****Num ber and enter the number below. Click on Send and in the window that will appear to confirm the CO number, click on Yes.
Sellers receive the e-mail and sign the offer. For more information, please see the article Signing a Document as an External Signatory.
2- Counter-offer
Add a blank CO in the eZsign folder. For more information, please see the article Adding/Editing/Deleting a Document in an eZsign Folder.
Load the CO template from your governing body (e.g. OACIQ). For more information, please see the article Loading a Template from your Governing Body.
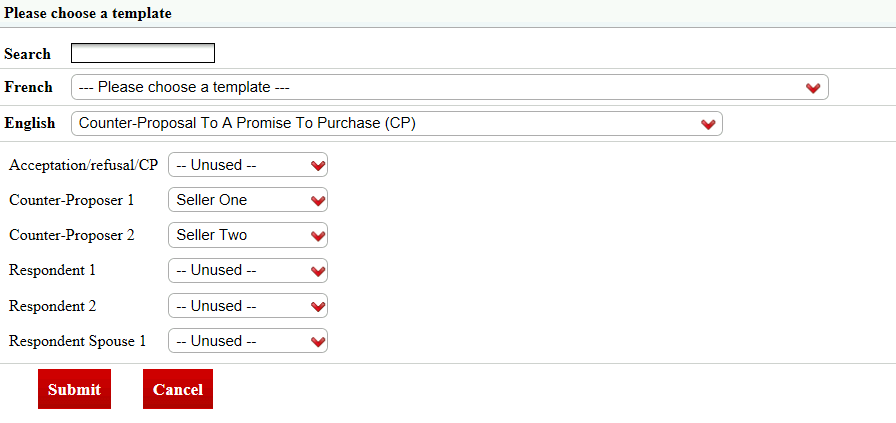
- Select the sellers for Counter-Proposer 1 and Counter-Proposer 2 (if applicable) and leave "-- Unused --" for other fields. Click on Submit.
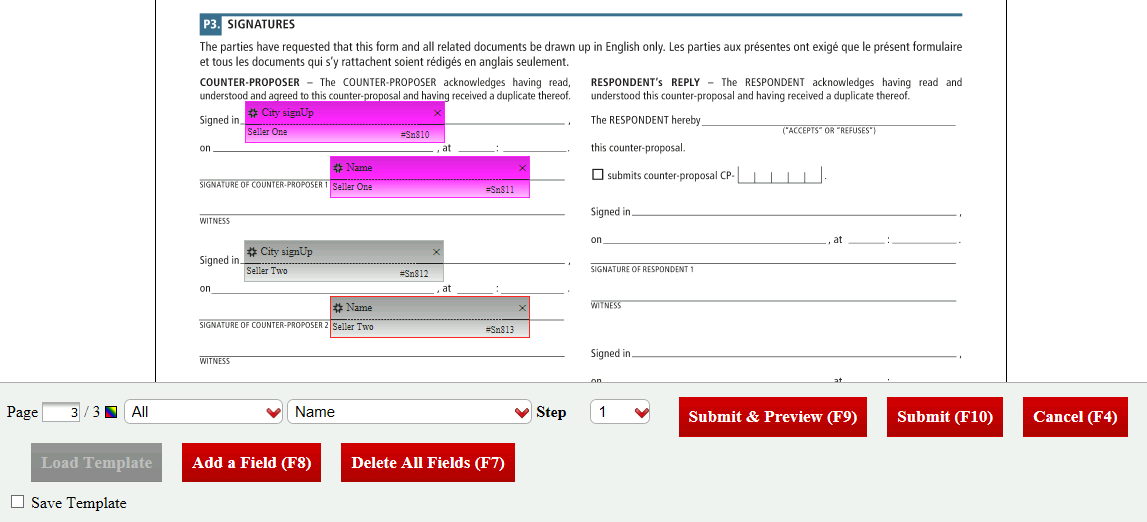
The fields will automatically appear in the right place in the "Signatures" section of the document, so do not edit/move them. Click on Submit.
Send the CO to sellers. For more information, please see the article Sending Documents to Sign.
Sellers sign the CO. For more information, please see the article Signing a Document as an External Signatory.
Buyer’s Agent
Add the CO signed by sellers in the eZsign folder. For more information, please see the article Adding/Editing/Deleting a Document in an eZsign Folder.
Load the CO template from your governing body (e.g. OACIQ). For more information, please see the article Loading a Template from your Governing Body.
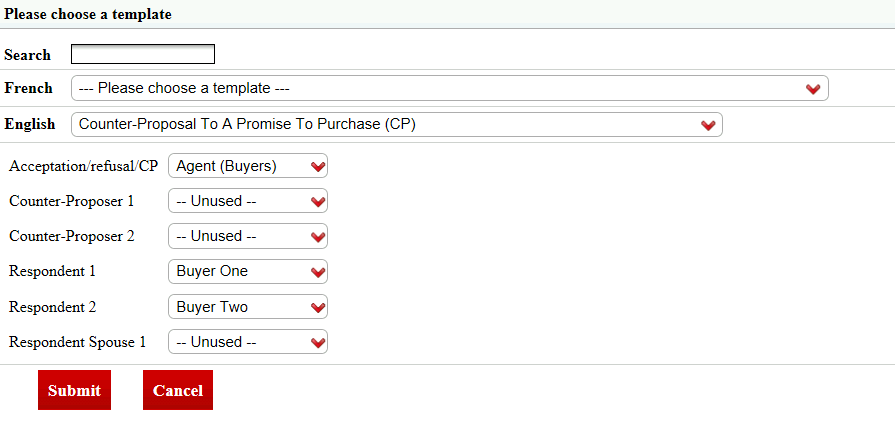
- Select yourself for Acceptation/refusal /CP (CO), select the buyers for Respondent 1 and Respondent****2 (if applicable) and leave "-- Unused -- for other fields. Click Treat.
NOTE: You can also select one of the buyers for the Acceptation/refusa l/CP (CO) field. However, we recommend selecting the buyer’s agent because if the answer is a counter-offer, it will be necessary to add the number of this counter-offer.
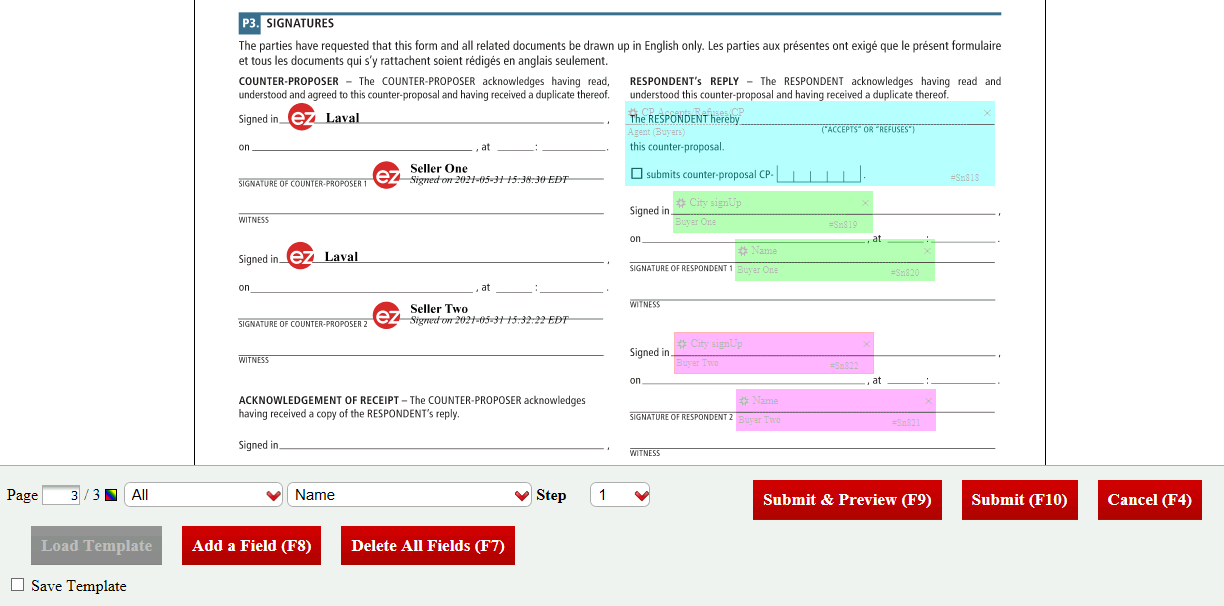
- The fields will automatically appear in the right place in the "Signatures" section of the document, so do not edit/move them. Click on Submit.
NOTE: The buyer’s agent step will be "2" and the seller’s step will be "3".
- Send the CO. For more information, please see the article Sending Documents to Sign.
NOTE: Only you, the buyer’s agent, will appear in the signatories because you have to sign the offer before the sellers.
- Sign the CO from your eZsign platform. For more information, please see the article Signing a Document as a User.
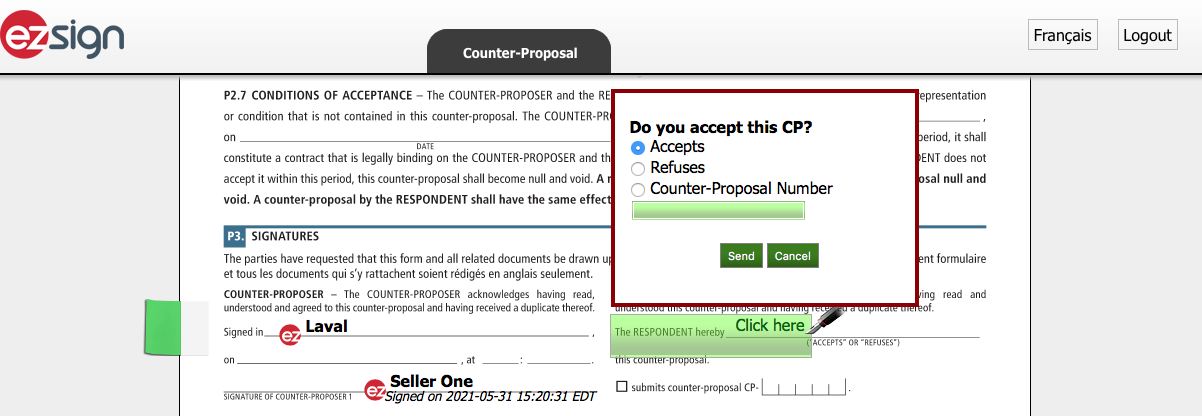
- Select Accepts and click on Send.
NOTE: In this example, buyers accept the first counter-offer, but there are 2 other options:
Select Refuses and click on Send.
Select Counter-Proposal****Numbe r and enter the number below. Click on Send and in the window that will appear to confirm the CO number, click on Yes.
When you have signed the CO, buyers receive the e-mail and sign the CO. For more information, please see the article Signing a Document as an External Signatory.